California State University, Fullerton, is my home away from home. I am a third-year Communications student concentrating in Entertainment and Tourism.
Communications is a broad major encompassing careers in a variety of industries, providing students with an abundant amount of career opportunities after graduation. Coming in as a freshman, I was an undeclared student, completely clueless about what I wanted to do with the rest of my life. I’ve received an endless amount of support from career counselors and industry specialists to declare Communications as my true calling. Since then, I’ve been more involved with industry related organizations and started my network.
With the assistance of CSUF professors, counselors, and peers, I’ve flourished. If you are a student who desires a career in entertainment, journalism, or public relations, CSUF has an exceptional Communications program that will provide you with a well rounded educational experience.
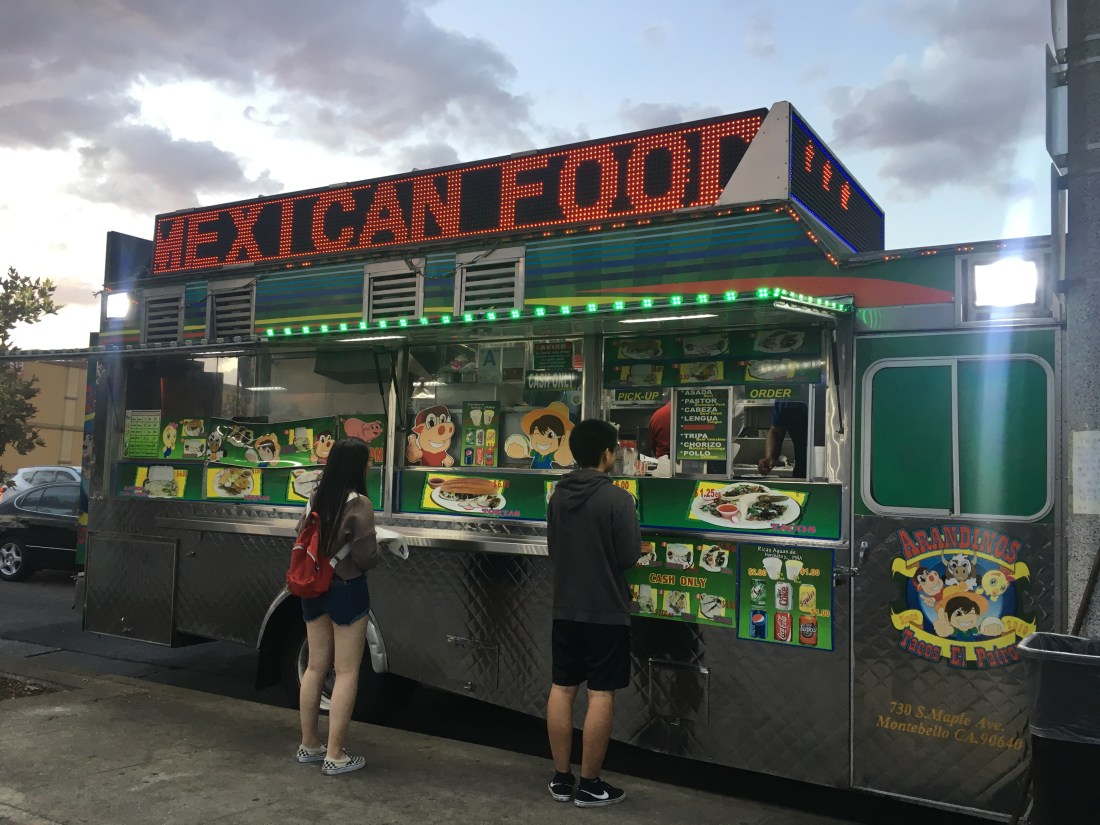
These are the best tacos in the SGV, San Gabriel Valley, well in my opinion. I come from an area of predominately Asians and Mexicans, so the food in my hometown is very diverse. You can see a Vietnamese sandwich place next to a taco shop, or a Taiwanese boba place across the street from a Japanese sushi place.
Due to this diversity and the intermingling of cultures I stumbled across this delicious street food. This taco truck is located in the parking lot of a 99 Ranch market at the intersection of San Gabriel and Valley. You can not miss it as it is known for it bright flashing lights at the top of the truck displaying the different kind of meats available at the truck in many different languages such as Spanish, English, and even Chinese!
This is a family owned business ran by the father, his sons, and nephews. The father would usually take the orders and is a very good talk. He remembers his regulars and sometimes even hooks it up. This quick and delicious taco stop is called, Arandinos Tacos El Patron!
This stop is perfect for late night craving as it is open till 12:30 am. The taco truck is usually very busy as it gets later in the night and it is very cool to see all kinds of people enjoy this amazing place. People from old to young, Asians to Mexican, students to mothers, comes to this place to enjoy this delicious street food.
This is the exterior of the taco truck. The bright electric sign on top of the truck is very hard to miss and attracts a lot of attention as it is parked at busy intersection.
*WARNING!!! THEY DO NOT ACCEPT CARD!! CASH ONLY! So if you pay this truck a visit be sure to have cash! *
They have a variety of different options, from multis to quesadillas to tacos to tortas. With many different types of meats and parts as well. Some options they carry are beef, chicken, pork, beef tongue, beef head, intestines, and even sausage.
This very fast and delicious street food is also very inexpensive! Here are the prices and a small description of how it is served down below.
Tacos: $1.25 for each taco, double stacked in tortillas. And you can choose any type of meat you would like. You can also get everything on them (diced white onions, cilantro and a red spicy sauce) or just plain.
Quesadilla: $6.00 for one large one, it is then cut in three slices. You can also get whatever type of meat you would like an have it plain of with everything on it (diced white onions, cilantro and a red spicy sauce).
Mulitas: $2.00 for each mulita. This is similar to a mini quesadilla as it is two tortillas with cheese and meat on the inside, which is then fried on the grill.
Tortas: $6.00 for one sandwich. For those who don’t know a sorta is a Mexican sandwich. You can pick whatever type of meat you would like!
*You can also ask for grilled onions and green peppers on the side!*
Each order comes with a bag of lime and red radishes, perfectly delicious with any of the meals above. These are just the few items they have at this taco truck, there are many more I have not mentioned and can be found on their yelp website.
Another helpful tip if you come to this taco truck is, they have SO MUCH SAUCE! I don’t know about you, but I am a saucy person, I love saucy foods! I personally love the green sauce, also known as salsa verde, this is delicious no matter what you pair it with.
I usually get a CARNE ASADS QUESADILLA WITH EVERYTHING IN IT, GREEN SAUCE ON THE SIDE, AND EXTRA LIME.
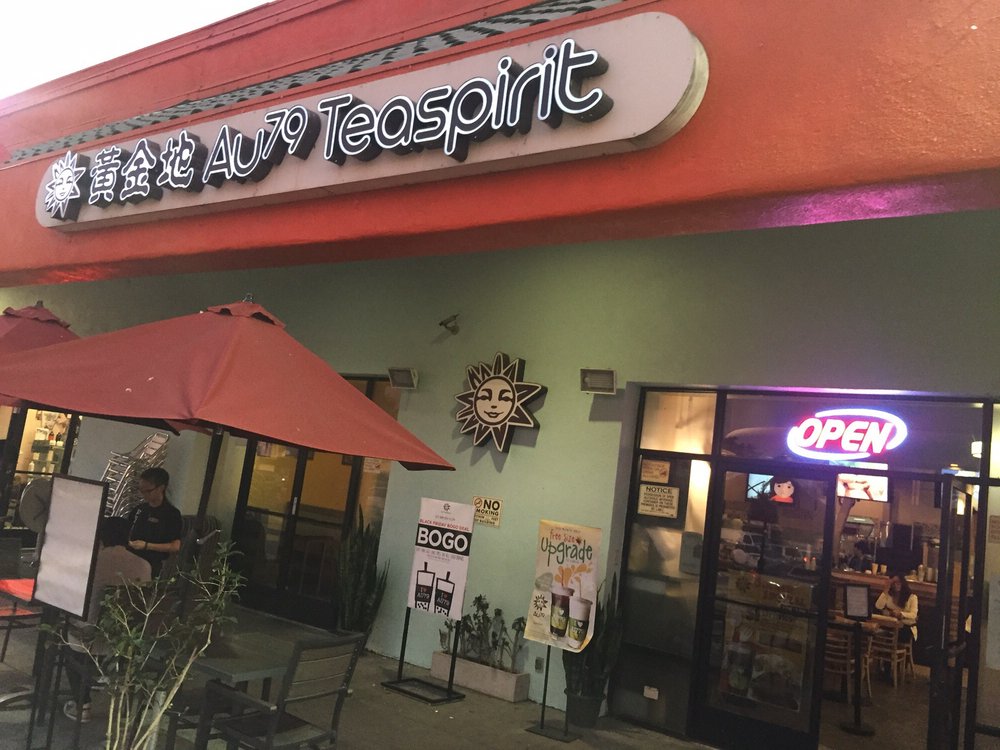
In the same parking lot you can find another one of my very favorites, AU79, this is a boba shop, which is usually open very late to the morning hours of 1:00- 3:00 am depending on the day!
This is a perfect combination with the tacos at Arandinos Tacos El Patron, just across the parking lot. For me boba and tacos are always eaten together, if I get tacos I have to get boba too and vice versa.
Here is the exterior of the tea house, they have patio seating for those who would like to have a smoke and a dine in lobby area for students who want to study.
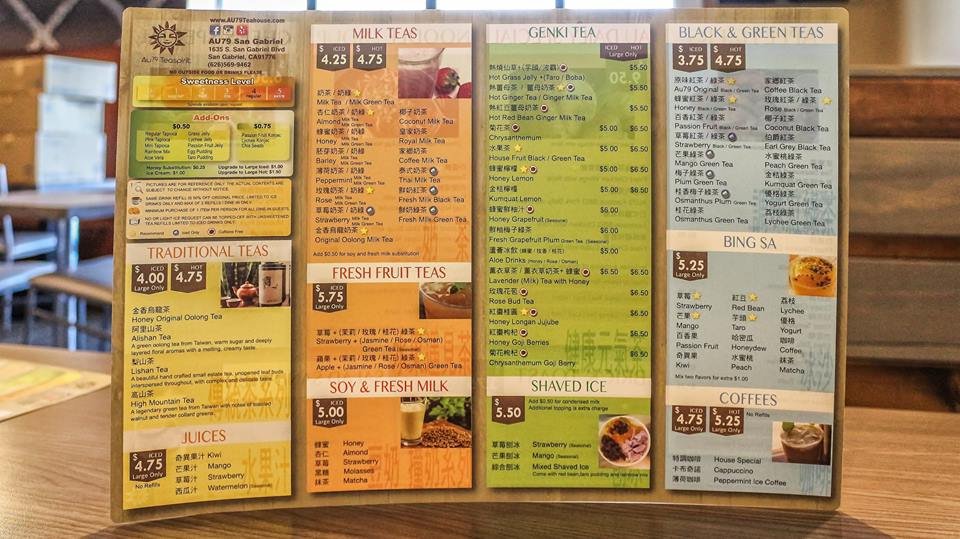
This teahouse is known for there fresh brew tea, served both cold or hot depending on your liking. They have green teas, black teas, milk teas, fruit teas, any type of tea you can think of. The price ranges from $4-$5 per cup, very much affordable.
*WARNING!! With orders less than $10, there will be an extra 30 cents charge for the transaction fee, so if you want to avoid this fee, bring cash or simply order another drink, THEY ARE ALL VERY TASTEY!*
Here is a menu of all the drink they have! 🙂
When I come here, I usually get a basic Jasmine green milk tea with MINI boba and less ice! Mini boba is the BEST thing ever! It is so much better than regular boba and doesn’t really require a lot of chewing!
Fun fact: I HATE CHEWING, IT IS SUCH A CHORE, but with mini boba it minimizes that chore for me! Best of both worlds, I can eat but not have to put in as much effort!
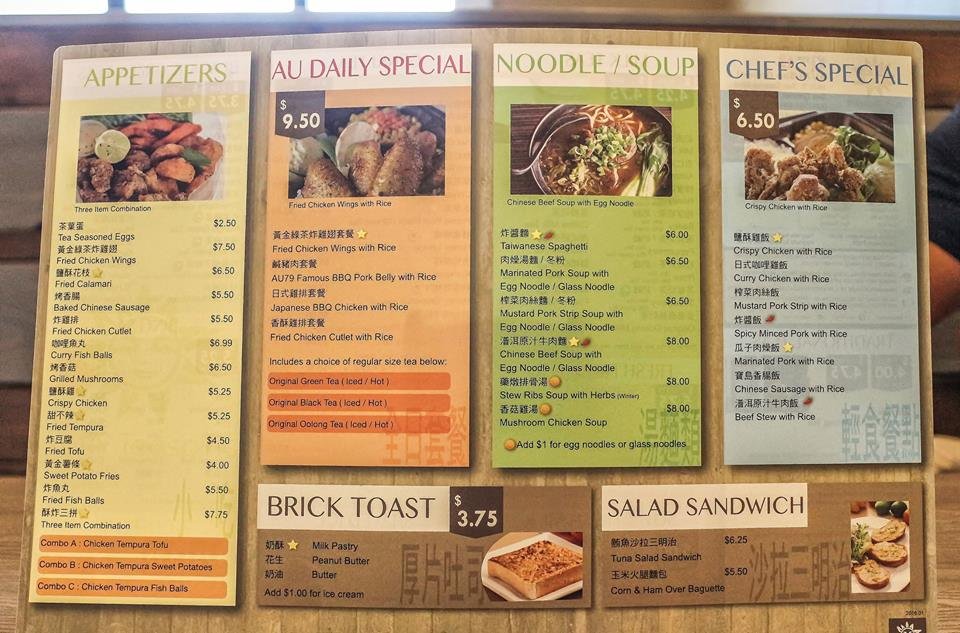
They not only have drinks at this teahouse, but also FOOD! I don’t usually get the food here, but I will provide a food menu for all those who are curious!
The food menu! 🙂
The combination for Arandinos Tacos El Patron tacos and Au79 boba will always satisfy my cravings!
I really hope you guys give these two of my favorites a try and who knows soon later they might even be your own two favorites! 🙂
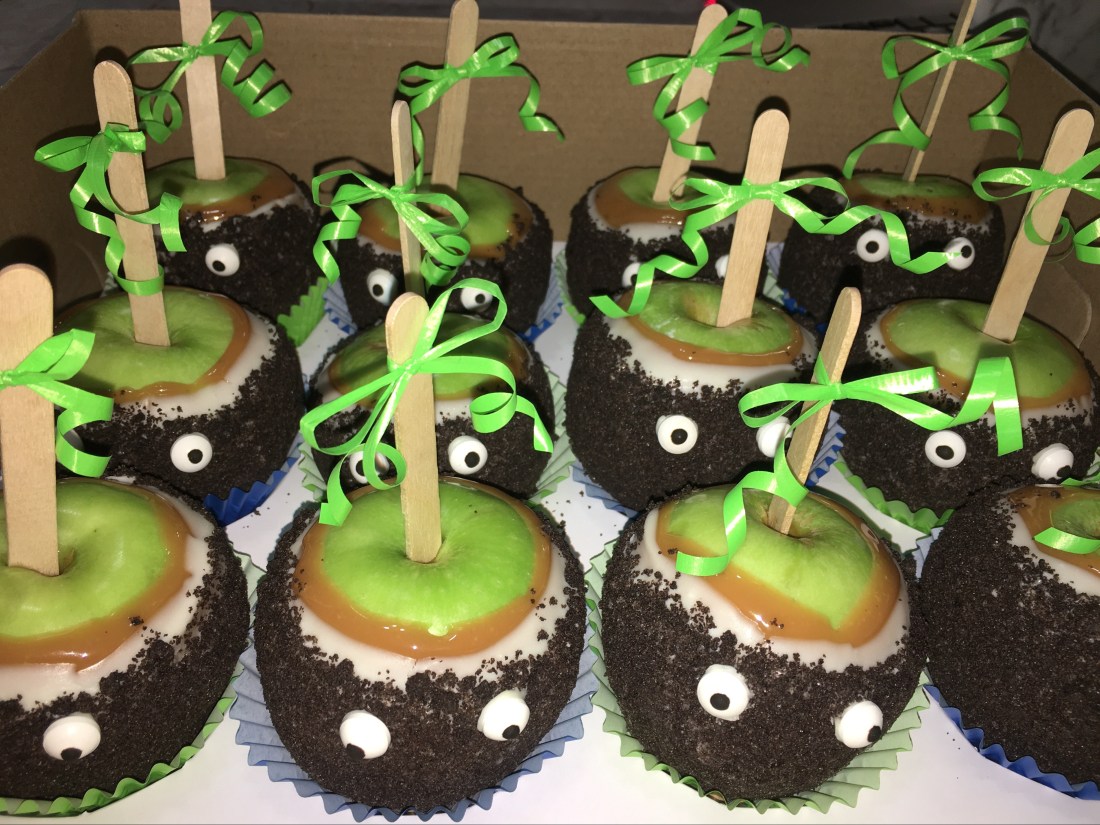
Looking for an easy sweet treat for this upcoming halloween season? Well I got you covered. Candy apples are a delicious sweet spin off of a healthy treat to satisfying a sweet tooth, perfect for kids or anyone else looking for caramel goodness.
These are not just any candy apples with a regular red hard sugar coating, that usually leaves you a few teeth short. These are a perfectly crafted three layered treat.
Don’t be frightened when I say three layers they are still as easy to make as 1, 2, 3! The first layer consists of ooey gooey caramel, the second a magnificent shell of white chocolate, and the third your choosing of coating, Oreo or cheesecake. Doesn’t sound too hard right, IT ISN’T, SO LETS BEGIN!
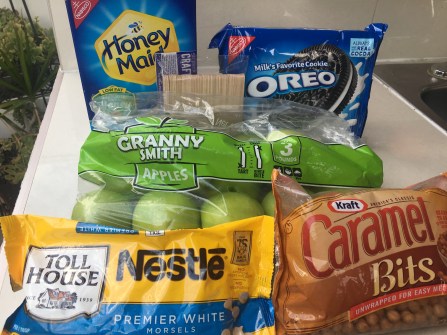
Ingredients/ supplies:
One 3LBS bag of Granny Smith apples
One bag of 50 Popsicle sticks (there will be extra)
One 14.4 oz box of Honey Maid Graham crackers, will only be using half the box.
One 14.3 oz box of Oreos, will only be using half the box.
One 12 oz bag of Nestle white chocolate
One 11 oz bag of caramel bits (can find this in the baking aisle)
2TBS of milk
1TBS of oil
Makes 12 apples, or the whole bag of Granny Smith apples.
LETS MAKE CARAMEL APPLES!
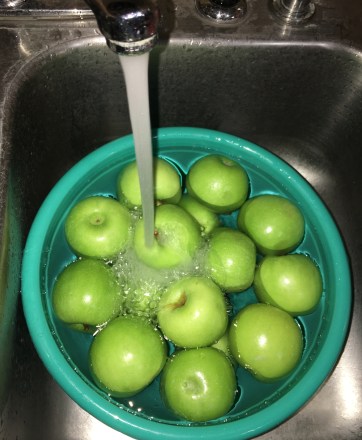
1. Wash the apples thoroughly, scrub and take off any stems on the top of the apple. 2. Dry apples with paper towels! No water should be present on the skin, as this will cause the caramel from sticking to the apples. 3. Stick the popsicle sticks half way into the apples to ensure security as we will be dipping them in caramel, chocolate, and the coating.
4. Grab a small sauce pan and add the bag of caramel bits into the pot along with 2 TBS of milk. Melt and stir on low heat until melted and has a consistency as the picture down below. Be sure not to have the fire on too high as the caramel will BURN!
5. TIME TO DIP THE APPLES!! Take one apple and dip it into this gooey goodness covering about 3/4th of the apple with caramel.
6. Have on hand large plates or cookie trays lined with wax paper or Saran Wrap to prevent the covered apples from sticking to the plate. Allow the first coating of caramel to cool in the fridge for 30 minutes.
7. In the meantime, we will be preparing our coatings! For the cheesecake apples we will crush graham crackers to the consistency of fine grain sand. For the Oreo caramel apples we will crush Oreos to the consistency of fine grain sand. (I used a bag and a rolling pin but feel free to use a food processor as this will be much easier!) Set aside.
8. Melt the Nestle white chocolate in the microwave. Put chocolate in a large microwave safe bowl with 1TBS of oil. Pop into the microwave for 1 minute. Take bowl out mix, put in for another minute, take out and mix. The chocolate should be all melted, if not keep stirring or put back into the microwave for 30 seconds. (Careful chocolate burns very easily in the microwave making it hard to dip as it will clump up.)
9. TIME TO DIP THE APPLES! Dip apples into the white chocolate, leave 1/2 and inch of the caramel showing. *Use picture down below as reference.
10. While the chocolate is still wet you will dip the apples into the Oreo crumbs making Oreo caramel apples, or you can dip them in the graham crumbs to make cheesecake caramel apples. Which ever one you choose they will be guaranteed delicious!
EXTRA STEP!
I made these apples for a kids Jurassic Park themed birthday party, so I decided to put eyes on the Oreo apples to make them little more festive. I called them DinoApples and the kids loved it!!
11. To recreate these apples all you need to do it attach some candy eyes with little bit of frosting. These can be found in the baking section of your local Walmart or target, or can be found online.
YUMYUMYUM
RAWR!
These also resemble the dust bunnies in the Hayao Miyazaki production of spirited away.
These are a cute and easy little treat which can be flexible for any occasion. From a Halloween party to a birthday party or even when you are craving a sweet treat, these caramel apples are the perfect solution.
For todays blog I decided to do something little different. Instead of showing you guys how to make a recipe from me, lets try out a recipe we find on Pinterest!
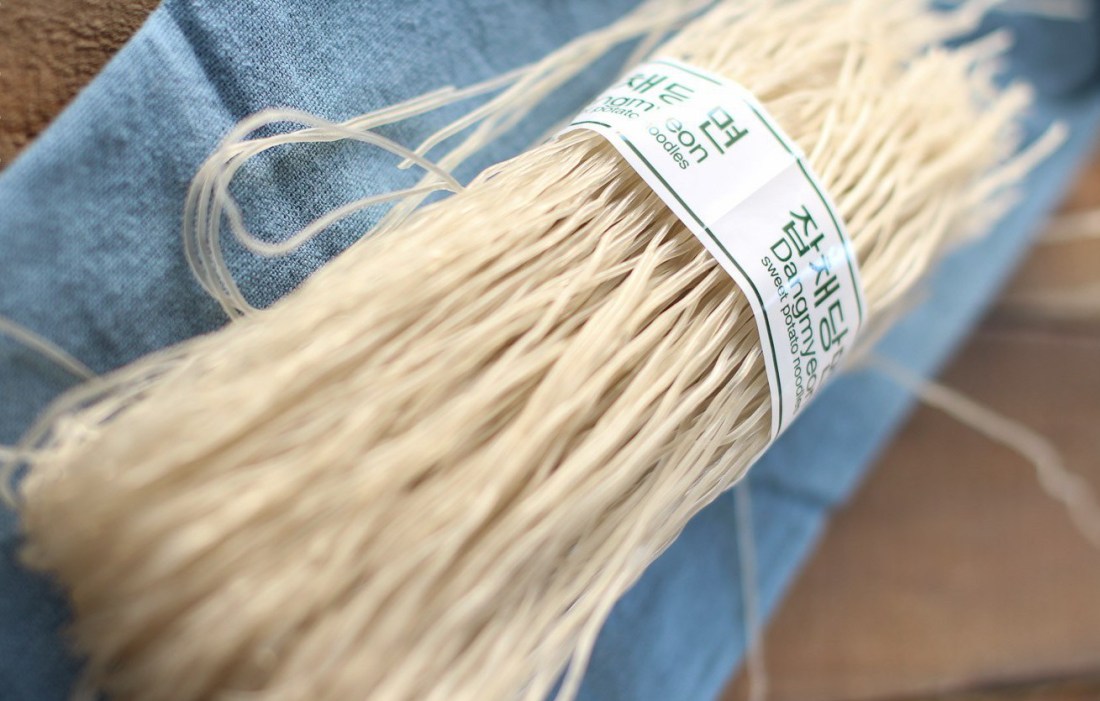
I was in the mood for some glass noodles also known as Japchae and decided to try to make some on my own as an experiment. I was able to gather all my Japchae ingredients for less than 20$ and this lasted me a full week, I am a college student and live on my own, so I usually meal prep for the week, this was a great recipe to do just that.
Japchae is a stir fry of Korean glass noodles with various vegetables along with your meat of choosing, this is optional. The noodles used in this recipe is a very unique as it is translucent and made from sweet potato starch.
Today we will be following a recipe posted on Pinterest by Sue, she is also a fellow food blogger, her blog is called My Korean Kitchen, where she posts about her love for Korean fusion foods. I found her recipe to be very simple and easy to follow.
Here is the link the recipe I will be trying to recreate. https://mykoreankitchen.com/korean-glass-noodle-stir-fry-japchae/
With recipes like this, it is very interchangeable. For example this recipe calls for bell peppers, but I am not too fond of bell peppers so I omitted that from my stir fry.
This recipe also uses beef but this week I was craving chicken, so I substituted the beef with chicken.
What I am trying to say is, with any recipe you try at home you are able to change and substitute ingredients for other ingredients. Whether it be because you dislike that ingredient or you just don’t have that ingredient on hand.
LETS BEGIN!
These are the original ingredients needed for the stir fry, I will input what I did differently down below after the original ingredients needed.
INGREDIENTS FOR JAPCHAE (6 TO 8 SERVINGS)
MAIN
250g (8.8 ounces) Korean sweet potato starch noodles (dangmyeon,당면)
NOODLES & MUSHROOM MARINADE – MIX THESE IN A SMALL BOWL
4 Tbsp soy sauce
1 Tbsp honey
1 Tbsp brown sugar
1 Tbsp sesame oil
1/8 tsp ground black pepper
FINISHING TOUCH
1 Tbsp sesame seeds
1 Tbsp sesame oil
(Optional) 1 extra large egg – rinsed, egg white and yolk separated
OTHER
Cooking oil – I used rice brain oil
Fine sea salt
Water to boil the spinach and the noodles
——————————————-CREDITS TO: mykoreankitchen.com————————————-
WHAT I DID DIFFERENTLY
Instead of using 100g (3.5 ounces) of rib eye fillet, I used two chicken breasts.
I omitted the 1/4 small red capsicum (bell pepper) (50g, 1.8 ounces) because I am not a fan of bell peppers
Instead of using 1 Tbsp sesame seeds, I just ended up omitting that as well.
I used 4-5 dried shiitake mushrooms in stead of the 100g (3.5 ounces) fresh shiitake mushroom, because I was unable to find them at my local grocery store.
STEPS FOR MY VERSION: (you can also follow Sue’s recipe on the link provide above)
1. Cut chicken into strips and putting it in a large bowl, then add the beef marinate; 1 Tbsp soy sauce, 1 tsp rice wine (mirin), 1/2 tsp minced garlic, 1/4 tsp ground black pepper, 1 tsp sesame oil. Stir until well combined.
Then wrap up the chicken and set in the fridge for 30 minutes.
2. Prepare all the vegetables. Cut carrots to small thin strips and thinly slice the onions.
3. As for the mushrooms, boil 4 cups of water and submerge the dried shiitake mushrooms in the water, cover and let sit for 20 minutes. After the 20 minutes, take out and rinse thoroughly. Squeeze any excess water from the mushrooms, and slice thinly.
4. Add sliced shiitake mushrooms in a bowl and add 1 Tbsp of the “noodle and mushroom marinade,” MIX and let it sit for 20 minutes.
5. Next boil water in a large pot to cook the spinach. Dip the spinach in the boiled water for 10 seconds and drain, run cold water on the leaves until cooled. Squeeze any extra water out.
6. Add “spinach seasoning” to the spinach in a bowl and mix lightly and evenly.
7. Boil a large pot of water, large enough to fit the glass noodles. Boil for 7 minutes in medium to high heat, test the texture of the noodles as it hits the 7 minute mark and leave in longer if you prefer the noodles to be more soft. Drain and run noodles under cold water. Cut the noodle 3-4 times then add “noodle and mushroom marinade,” mix and let sit.
8. Begin with cooking the egg white and yolk. Separate the yolk from the egg white beat both in separate bowls and cook both separately with a little oil on the pan. Once cooked, slice into thin strips.
9. In the same pan add a little more oil, put on medium heat and cook the sliced onions. cook until translucent with a pinch of salt usually around 5 minutes on medium heat. (Depending on how you like your onions, you can take them out earlier for more of a bite or cook them longer for a more flexible texture.) Take onions out and set aside in a small bowl.
10. With the same pan cook the julienned carrots with a tad of oil to coat the pan. Add a pinch of salt and cook until your desired softness, for me it was around 5 minutes on medium to low heat.
11. Then take the marinaded shiitake mushrooms and in the same pan with a dash of oil and cook for 3 minutes.
12. Cook the marinated chicken on medium heat with a little oil coating the same pan. Cook for 7 minutes until cooked through.
13. Now stir fry the marinated glass noodles for 3 minutes.
14. In a large bowl mix all ingredients together. Mix in noodles, carrots, onions, mushrooms, chicken, and spinach until well combined.
This is a Vietnamese dessert that first originated from Thailand, its a spin off of the original Thai dessert, as Vietnamese people substituted fruits local to their region and area. So what is in this exotic dessert you may ask? It consists of various canned fruits mixed in with half and half milk for a milky taste.
You might be thinking canned fruits and milk, thats it, what’s so special about that?
Canned fruits and half and half milk does not seem to be the ideal image of a dessert, but most asian desserts are made with the bases of milk along with other types of add ons.
Growing up in the states and having my family being immigrants from Vietnam, they made sure we stayed true to our roots with the rituals we do, the language we speak, and most importantly with the food we eat. Che Thai was one of those easy to make desserts my mom would make when the kids were craving something sweet and refreshing.
There are many different spin offs of this dessert as it is so versatile, you can add the fruits you personally like or dislike. These few ingredients with earn you brownie points as you bring this dessert to a party or gathering. With that being said lets begin!
HOW TO MAKE CHE THAI!
Ingredients:
1 container of Coconut jelly squares
Half and half, or can use substitute of
milk and coffee creamer
1 can of green grass jelly
1 can of lychee jelly
1 can of jackfruit
1 can of Palm seed slices
Brown sugar to taste
Serving size: 8
Steps:
First you would like to open all the cans of fruits and drain out the sugary syrup.
Can add the coconut jelly, lychee chunks, and palm seed slices into a large container.
The jackfruit comes as a whole fruit, so cute the jackfruit into thin stripes.
The green grass jelly will also require to be cut into small cubes as it is a solid block of jello.
Now you will need a large container to mix the fruits and milk together.
Add all the canned and cut fruit into a large container.
7. Add half a gallon of half and half, or add 5 cups of milk and 3 cups of coffee creamer.
8. Stir up the concoction and add brown sugar to taste. For me personally I usually use about 3-5 tablespoons of sugar for extra sweetness use more and for less, use less or none at all, the canned fruits already contain a bit of sweetness as it was preserved in the syrupy liquid.
This easy to make Vietnamese dish consists of sliced pork, shrimp, noodles, and a variety of your favorite vegetables wrapped in a Vietnamese rice paper and dipped in a delicious peanut sauce. This simple to make but beautifully mouth-watering roll is one of my childhood favorites and today I will be showing you how to make this decadent dish.
First off we have to understand there are a variety of spring rolls out there, we have the fried one that everyone may know from Panda Express and the clear transparent ones, the one I will be writing about today.
Lets Get Started!!
Shrimp and pork spring rolls with peanut sauce and 4 dots of sriracha!
Ingredients:
2 lbs of pork
2 lbs of shrimp
Vegetables of your liking, in my case, 1 head of lettuce and 2 cucumbers
One bag of vermicelli noodles
One pack of 23 cm spring roll paper (can be found in the Asian section of the grocery store or at 99 Ranch market)
1 cup Peanut Butter
1/4 a cup of Water
1 cup Hoisin sauce
This recipe feeds four to five people with around ten rolls each.
HOW TO MAKE SUMMER ROLLS
1. Gather you’re ingredients.
Vegetables, vermicelli noodles, and rice paper.
Meats used in this recipe.
Ingredients for peanut sauce.
2. Fill two pots with water for boiling both the pork and shrimp. Let boil on medium heat until the pork is the color of the picture below, usually will take 30 minutes. Let the shrimp boil until the shell begins to peel away from the meat of the shrimp around 20 minutes on medium heat.
Boil the 2 lbs of pork
Boil the 2 lbs of shrimp
3. Peel and devein the shrimp, then cut in half like the picture shown below.
4. Slice the pork into small chunks, like the picture shown below. 5. Boil another pot of water large enough to fit one full bag of vermicelli noodles, bring up to a boil then add the noodles, wait for the water to boil once again. Turn off the heat and cap the pot with a lid, let it sit for 30 minutes until the noodles have come to a consistency of your liking. (Should flexible) 6. Wash lettuce and slice cucumbers into thin sticks.
7. Make the peanut dipping sauce, drab a small sauce pot and add one cup of hoisin sauce and one cup of creamy or crunchy peanut butter along with 1/4 of a cup of water. Stir the mixture under low heat until well combined and has the consistence of honey. (I will be using creamy today because I prefer the creamy one over the crunchy, but either or will work)
8. Grab a bowl large enough to dip the 23 cm rice paper in, filled with warm water.
9. Now that you have prepped everything you can now set the table up, you will need 4 or 5 empty plates, large enough to hold a 23 cm rice paper. You will also need 4 or 5 small sauce boils so each person can have their own dip. Lay everything out on the table as this will be a very interactive family meal.
Our table set up!
9. Start wrapping and enjoy this simple but delicious meal with your family and friends.
Here is a quick clip to my mom of my 3 roommates and I enjoying our summer rolls!


 With recipes like this, it is very interchangeable. For example this recipe calls for bell peppers, but I am not too fond of bell peppers so I omitted that from my stir fry.
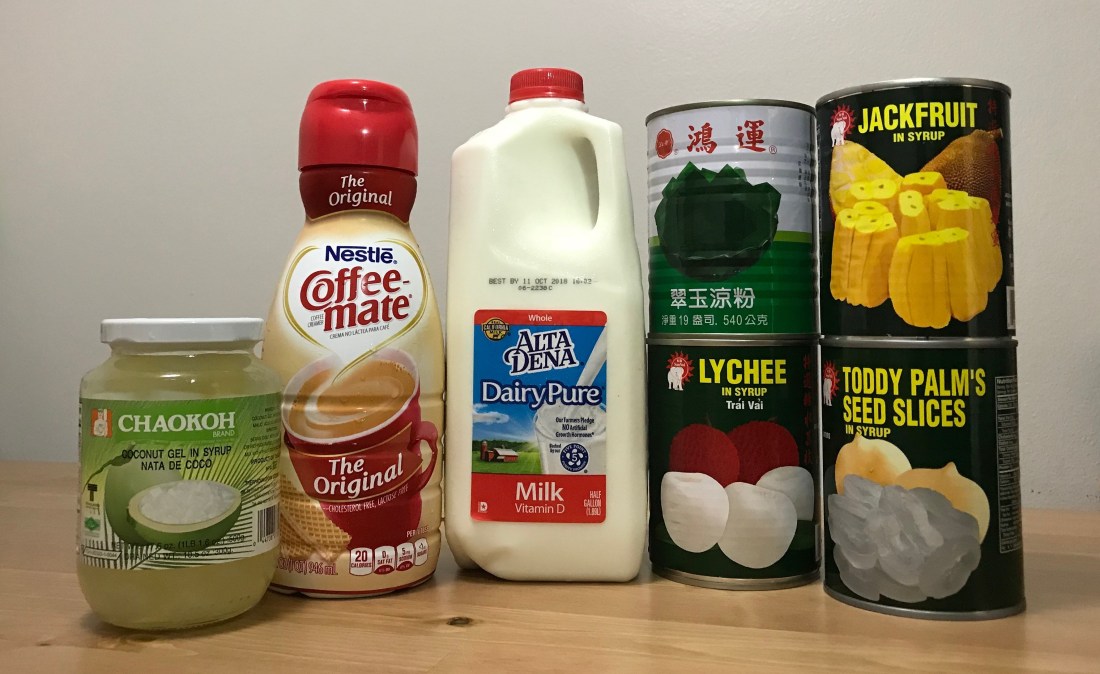


 5. Boil another pot of water large enough to fit one full bag of vermicelli noodles, bring up to a boil then add the noodles, wait for the water to boil once again. Turn off the heat and cap the pot with a lid, let it sit for 30 minutes until the noodles have come to a consistency of your liking. (Should flexible)
  6. Wash lettuce and slice cucumbers into thin sticks.


